
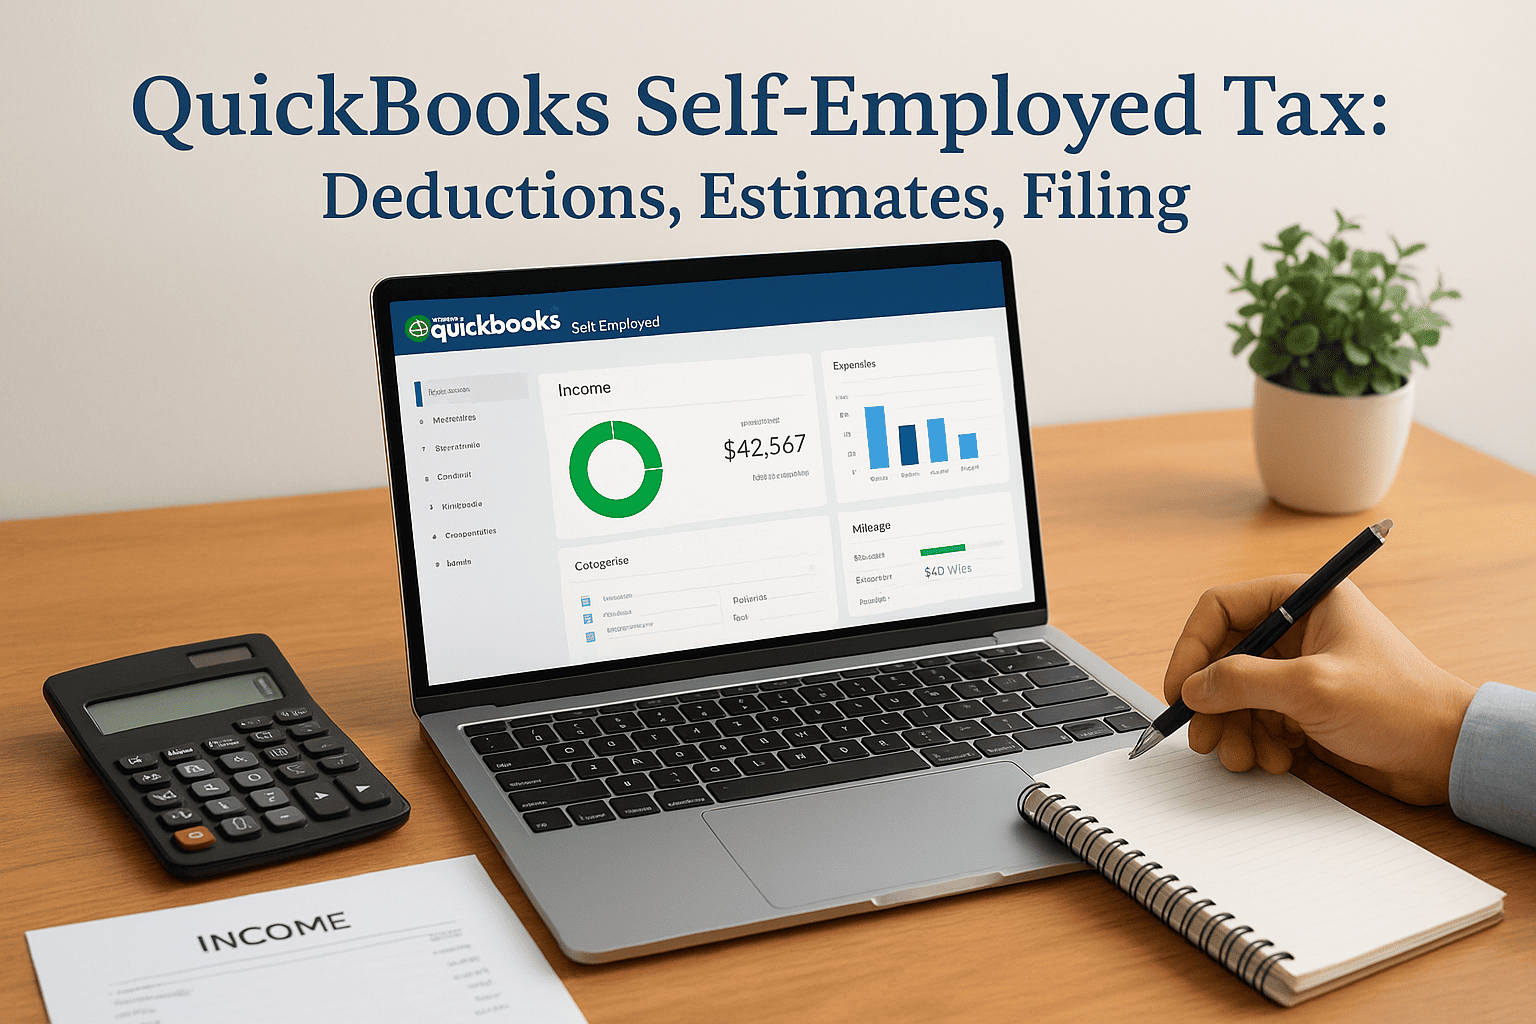
Managing QuickBooks Self-Employed tax features can save you real time and money, if you know how to use them correctly. The software tracks income and expenses, categorizes deductions, and estimates what you owe each quarter. But plenty of freelancers and independent contractors set it up once and never touch it again, which leads to missed deductions and inaccurate quarterly payments that catch up with them at filing time.
This guide walks you through how QuickBooks Self-Employed actually handles your tax obligations, from automatic mileage tracking and Schedule C deductions to generating estimated tax payments and exporting your data for filing. You'll learn what the software does well, where its limitations show up, and how to avoid the most common mistakes that lead to underpayment penalties or overpaying the IRS.
At Tax Experts of OC, our CPAs and Enrolled Agents work with self-employed clients across all 50 states who use tools like QuickBooks to stay organized throughout the year. We regularly see returns where the software tracked everything correctly, but the taxpayer didn't review or adjust the settings to match their actual situation. That gap between what the tool calculates and what you actually owe is where problems start. Whether you're filing on your own or working with a professional, understanding how your software handles self-employment tax puts you in a much stronger position come April.
What QuickBooks Self-Employed tracks for taxes
Before you can trust the numbers the software produces, you need to know what it actually captures and what it ignores. QuickBooks Self-Employed is built specifically for sole proprietors and independent contractors, so its tracking features are organized around Schedule C and self-employment tax obligations rather than the full accounting needs of a corporation or partnership. That focus is both its biggest strength and its most important limitation.

Knowing exactly what the software tracks, and what it doesn't, prevents you from filing with false confidence.
Income and business expenses
QuickBooks Self-Employed records every transaction that flows through your connected bank accounts and credit cards. When income arrives, the software logs the amount, date, and source. When you spend money, it assigns the transaction to a Schedule C category such as advertising, office expenses, or professional services. These categories map directly to the lines on Schedule C, which is the IRS form used to report profit or loss from a sole proprietorship or single-member LLC.
You can also record transactions manually if a client pays you in cash or through a method that doesn't sync automatically. Every dollar that comes in or goes out needs to live somewhere in the system before the numbers become reliable for tax purposes.
Mileage tracking
The app includes a built-in GPS mileage tracker that runs in the background on your phone. Each trip is logged automatically, and you then swipe to mark it as business or personal. At tax time, QuickBooks Self-Employed applies the IRS standard mileage rate to your total business miles and adds that figure to your Schedule C deduction calculation.
For 2025, the IRS standard mileage rate for business use is 70 cents per mile. If you drove 10,000 business miles, that's a $7,000 deduction reducing your taxable self-employment income. The software handles the math, but you still need to review each trip log for accuracy before you file.
Quarterly estimated tax payments
One of the most useful features for self-employed individuals is the estimated tax dashboard. QuickBooks Self-Employed calculates your projected annual profit, applies your federal and state tax rates, and tells you how much to send each quarter. This covers both income tax and self-employment tax, which is the 15.3% contribution toward Social Security and Medicare that you pay entirely on your own when no employer withholds it.
The estimates update automatically as you add transactions throughout the year. If you land a large contract in October, the Q4 estimate will reflect that increase before the January payment deadline arrives.
What the software does not track
Understanding the gaps matters just as much as knowing the features. QuickBooks Self-Employed does not handle payroll, inventory, or depreciation schedules for business assets beyond the standard mileage deduction. It also doesn't support double-entry bookkeeping, which means it isn't the right tool once your business needs auditable financial statements or investor-ready reporting.
The software also won't identify tax planning opportunities specific to your situation, such as whether you should elect S-corp status, open a SEP-IRA to reduce taxable income, or accelerate deductions before year-end. Those decisions require a professional who can look at your full financial picture rather than a single data feed.
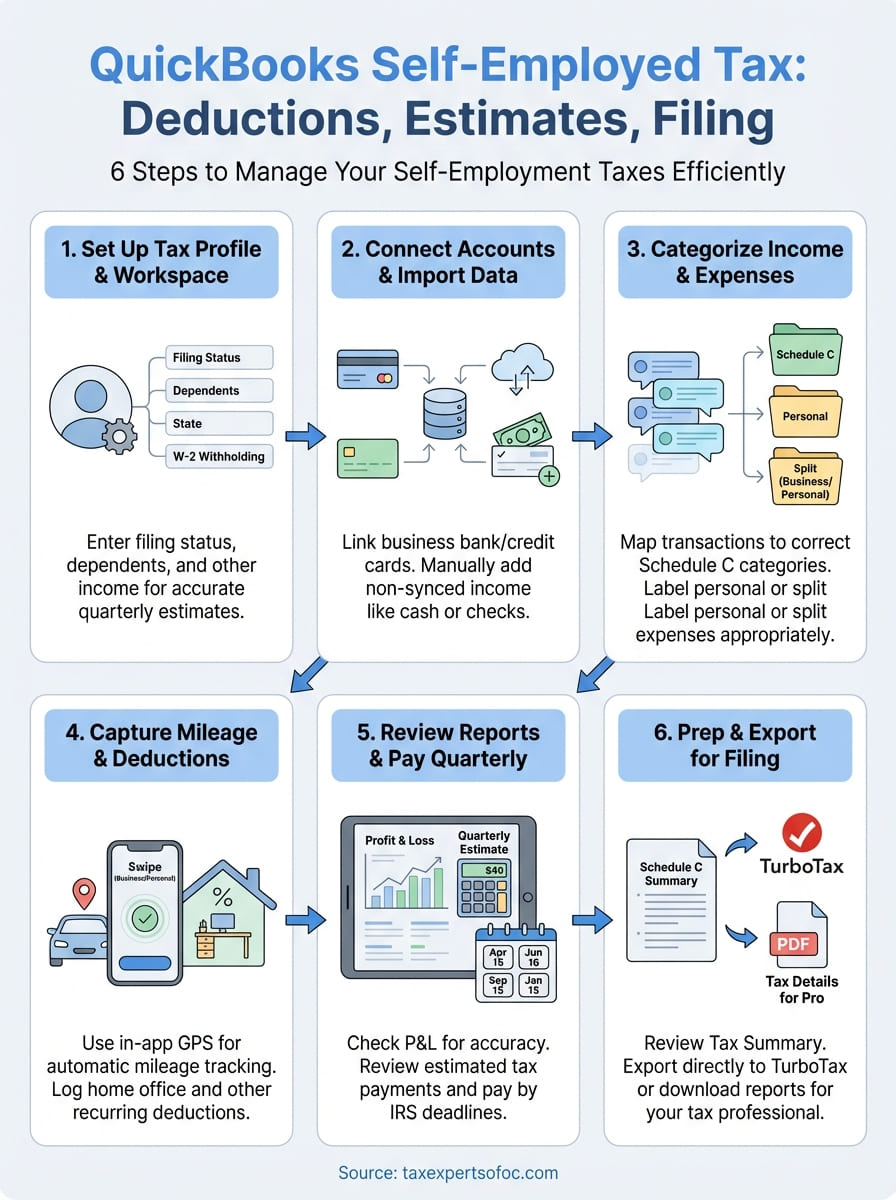
Step 1. Set up your tax profile and workspace
Before QuickBooks Self-Employed can calculate anything useful, you need to feed it accurate baseline information about your filing situation. Skipping this step or rushing through it is one of the most common reasons the quarterly estimates and deduction calculations come out wrong from the start. Spend 15 minutes here and the rest of the year becomes much easier to manage.
Enter your tax information
Open the app or web dashboard and navigate to Tax Profile under your account settings. This is where you tell the software who you are for tax purposes. You'll need to enter the following details before the QuickBooks self-employed tax calculations reflect your actual situation:
| Field | What to enter |
|---|---|
| Filing status | Single, Married Filing Jointly, etc. |
| Number of dependents | Affects your estimated income tax rate |
| Will you owe self-employment tax? | Select Yes if you're a sole proprietor or contractor |
| State | Your state of residence for state tax estimates |
| Additional withholding | Enter any W-2 withholding if you also hold a salaried job |
Getting your filing status and dependent count right is critical because QuickBooks uses these inputs to calculate your effective tax rate for quarterly estimates.
If you have W-2 income from a day job alongside your self-employment income, enter that withholding amount in the additional income field. The software will factor it in and reduce your estimated quarterly payments accordingly, which prevents you from overpaying through the year.
Set your business type and fiscal year
Under the business settings section, confirm that your entity type is set to sole proprietor or single-member LLC. This determines how the software maps your expenses to Schedule C. Your fiscal year should match the calendar year (January through December) for most self-employed individuals, since that aligns with standard IRS filing requirements for personal tax returns.
You'll also want to set your home currency to US dollars and confirm your industry, even if it seems optional. Some industry settings influence which default expense categories appear in your transaction list. A freelance writer and a food delivery driver both use Schedule C, but their most common deduction categories look very different. Choosing the right industry upfront means fewer manual adjustments every time you categorize a transaction later in the workflow.
Step 2. Connect accounts and import transactions
Accurate QuickBooks self-employed tax calculations depend entirely on the quality of the data inside the software. If your transactions are incomplete or duplicated, every estimate and report downstream will be off. This step is where you pull your financial activity into one place so the software can do its job.
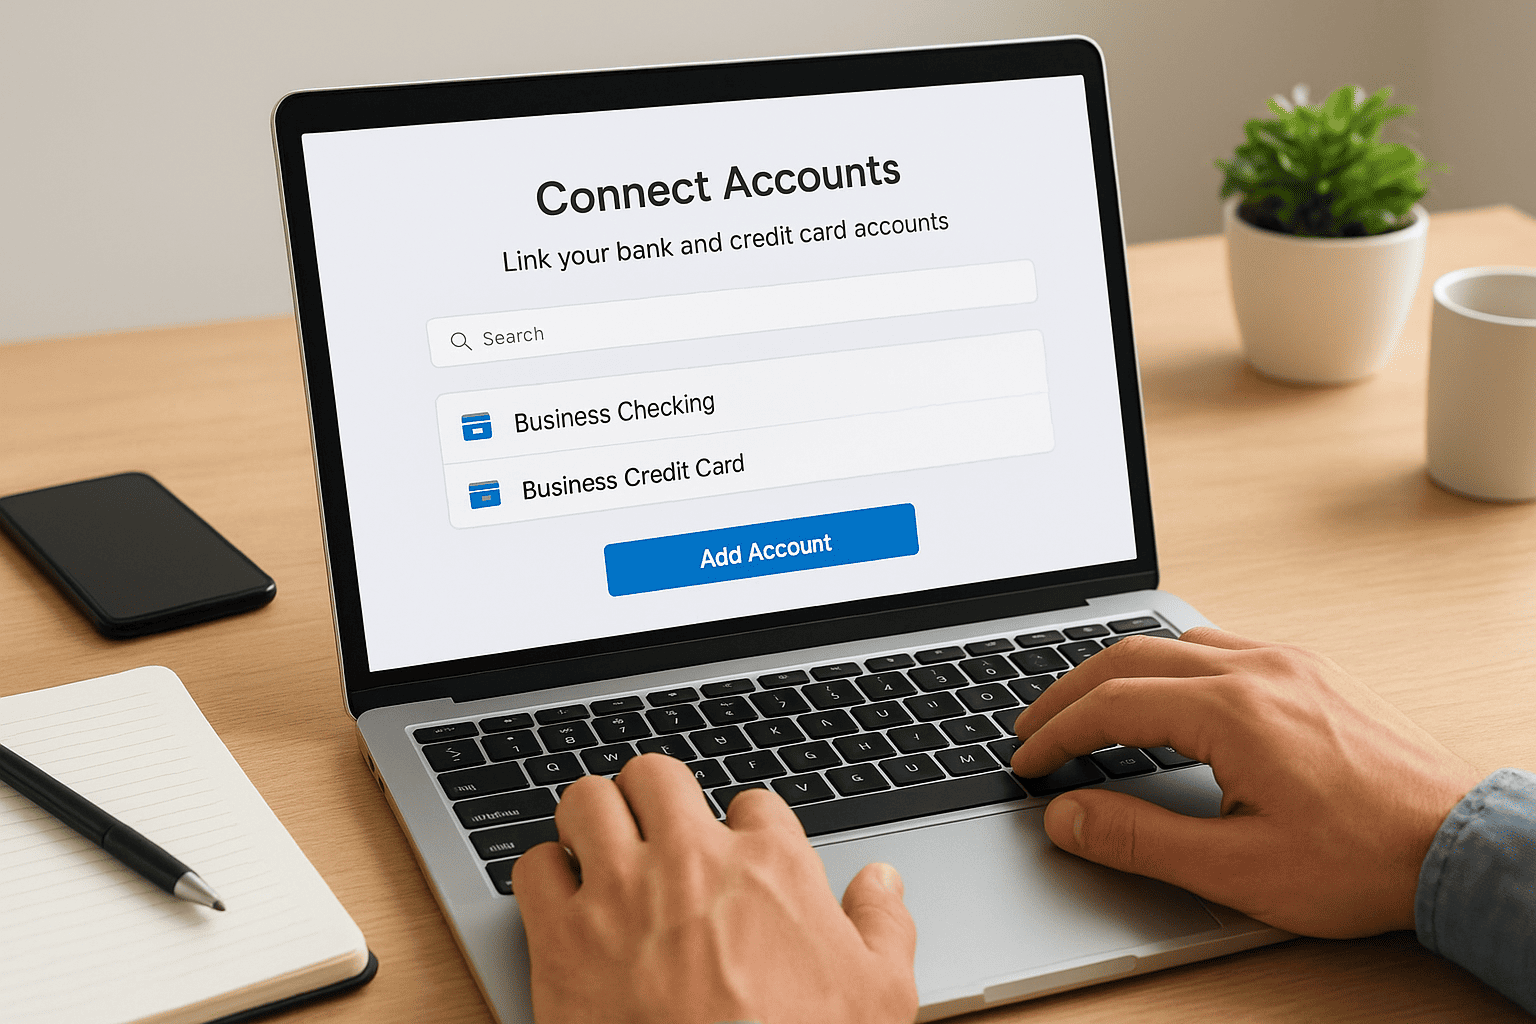
Link your bank and credit card accounts
Navigate to the Transactions tab and select "Add Account." QuickBooks Self-Employed uses Intuit's bank connection system to pull in transactions automatically. You'll search for your financial institution by name, log in with your online banking credentials, and select the specific accounts you want to sync. For most self-employed individuals, that means connecting:
- Your primary business checking account where clients pay you and you cover business expenses
- Any business credit card you use for deductible purchases
- A PayPal or payment processor account if that's how clients send money
Connect only the accounts that contain business activity. Mixing in a personal savings account you never use for work creates extra noise and unnecessary categorization work every week.
Once linked, QuickBooks pulls in 90 days of historical transactions automatically. This gives you a starting point without requiring you to enter everything manually. From that point forward, the sync runs daily in the background.
Import transactions you don't sync automatically
Not every payment hits a connected account. Clients who pay by cash or check, Venmo personal transfers, or direct deposits into an account QuickBooks doesn't support all need to be entered manually. Go to Transactions, then select "Add Transaction" and enter the amount, date, category, and a brief description. Keep this habit consistent so no income goes unrecorded before your quarterly review.
For larger batches of older transactions, you can upload a CSV file from your bank's export feature. Download your statement directly from your bank's website, then import it through the "Import" option in the Transactions tab. The format QuickBooks expects is straightforward: date, description, and amount in separate columns. Clean up the file in a spreadsheet tool before uploading to avoid duplicate entries, especially if the date range overlaps with what the automatic sync already pulled in. Once your accounts are fully connected and your historical data is in, you're ready to start working through the transaction list.
Step 3. Categorize income and expenses correctly
Once your transactions are loaded, you need to assign each one to the correct category. This is where QuickBooks self-employed tax accuracy is won or lost. The software makes educated guesses based on the merchant name, but those guesses are often wrong, especially for recurring vendors you use for both business and personal purchases. Work through your transaction list at least once a week rather than saving it all for year-end.
Map expenses to the right Schedule C category
Every expense category inside QuickBooks Self-Employed corresponds to a specific line on Schedule C. Placing a transaction in the wrong bucket doesn't just look untidy; it can shift your deduction to a less favorable position or cause a mismatch if the IRS ever reviews your return. Use this table as a quick reference when you're unsure which category fits:
| Transaction type | Correct Schedule C category |
|---|---|
| Hosting, domain, software subscriptions | Other Common Business Expenses |
| Client meals (50% deductible) | Meals |
| Home office internet bill (business portion) | Utilities |
| Professional development course | Education |
| Contractor or freelancer you paid | Contract Labor |
| Advertising or sponsored posts | Advertising |
| Business phone bill | Phone |
Assigning contractor payments to "Contract Labor" matters because the IRS cross-references that line against the 1099-NEC forms you issue to people you paid $600 or more during the year.
Mark each transaction as Business, Personal, or Split before you assign its category. The split option is important for shared expenses, such as a phone plan you use for both work and personal calls. When you select split, QuickBooks lets you enter a percentage for the business portion, and it applies only that share to your Schedule C deduction.
Handle mixed personal and business transactions
If you have transactions in the list that belong entirely to your personal life, mark them as Personal immediately so they drop out of your profit and loss calculation. Leaving them uncategorized inflates your apparent expenses and causes your quarterly estimates to misrepresent your actual profit.
For regular mixed-use vendors, you can set a default category rule inside QuickBooks. Go to the transaction, assign it, and check the option to apply that category automatically whenever the same merchant appears. This saves time and keeps your records consistent without manual review every single time a charge shows up.
Step 4. Capture deductions and mileage year-round
Deductions are where self-employed taxpayers recover the most money, and QuickBooks self-employed tax tools give you two reliable ways to capture them automatically. The key is building a habit of logging deductions as they happen rather than reconstructing them from memory at year-end. A deduction you forget to record is a deduction you don't get to take.

Track mileage on every business trip
Open the QuickBooks Self-Employed mobile app and turn on automatic mileage tracking under Settings. Once enabled, the GPS logs every trip in the background. After each drive, you swipe right to mark it as business or left to mark it as personal. Each business trip gets added to your running total, and the software multiplies your annual business miles by the current IRS standard mileage rate to produce your deduction figure.
Review your trip log weekly, not annually. The app timestamps each drive, but memory fades fast, and a vague trip description like "drive" won't hold up if the IRS ever asks for documentation.
For trips where the auto-tracker missed the start, you can add them manually. Tap "Add Trip," enter the date, starting point, destination, and distance, then mark the purpose. Keep descriptions specific, such as "client meeting at 123 Main St" rather than just "client visit." If you use your vehicle for both personal and business purposes, the mileage log automatically separates the two, so only the business portion affects your Schedule C calculation.
Log home office and other recurring deductions
If you work from a dedicated space in your home, calculate the square footage of that room divided by the total square footage of your home to get your business-use percentage. Apply that percentage to qualifying expenses like rent, mortgage interest, utilities, and renter's or homeowner's insurance, then enter each as a split transaction inside QuickBooks. For example, if your office is 150 square feet in a 1,500-square-foot home, 10% of your qualifying home expenses counts as a deductible business cost.
Other recurring deductions worth capturing throughout the year include professional subscriptions, equipment purchases, and business-related travel costs beyond mileage. For each expense, record it in QuickBooks the same week it occurs and assign the correct category. The IRS Publication 535 outlines which business expenses are deductible and helps you verify that a category qualifies before you apply it to your Schedule C.
Step 5. Review reports and estimate quarterly taxes
Once your transactions are categorized and your mileage is logged, you have everything you need to evaluate your tax position before a deadline hits. The reports inside QuickBooks give you a real-time picture of your profit, your deductions, and how much you owe each quarter. Reviewing them monthly, rather than scrambling the week before a payment is due, prevents surprises and keeps your cash flow predictable throughout the year.
Check your profit and loss report
Navigate to the Reports tab and open the Profit and Loss statement. This report summarizes your total income, your deductible business expenses, and your net profit for the period you select. Set the date range to the current quarter so you can see exactly what the IRS will base your estimated payment on. If the expense categories look wrong, fix them in the Transactions tab before you move on, because the P&L pulls directly from those categorizations.
Run the year-to-date view as well and compare it to the same period from the prior year if you have that data available. A significant increase in income without a matching increase in categorized expenses is a signal that you may have missed deductions during the year, which is worth investigating before you commit to a payment amount.
Read the quarterly tax estimates
Open the Taxes tab inside your QuickBooks self-employed tax dashboard. The software displays your projected annual profit, applies your federal self-employment tax rate of 15.3%, and layers on your estimated income tax based on the filing profile you set up in Step 1. The result is a recommended payment amount for the current quarter.
If the estimate looks unexpectedly high or low, go back and check that your tax profile reflects your current filing status, any W-2 withholding, and your actual state of residence.
The IRS requires estimated payments four times a year. Missing a deadline or underpaying triggers a penalty under IRS Form 2210, so mark these dates on your calendar now:
| Quarter | Income period | Payment deadline |
|---|---|---|
| Q1 | January - March | April 15 |
| Q2 | April - May | June 16 |
| Q3 | June - August | September 15 |
| Q4 | September - December | January 15 (next year) |
Pay directly through the IRS Direct Pay portal using your bank account at no cost. Keep a screenshot or confirmation number for every payment so you have documentation when you reconcile at filing time.
Step 6. Prep Schedule C data and export for filing
When your transactions are categorized, your mileage is documented, and your quarterly payments are recorded, you're ready to pull the data together for filing. This final step in managing your QuickBooks self-employed tax workflow is about verifying accuracy before any numbers leave the software and land on your return. Rushing through this review is where small errors become filed mistakes that are time-consuming to correct.
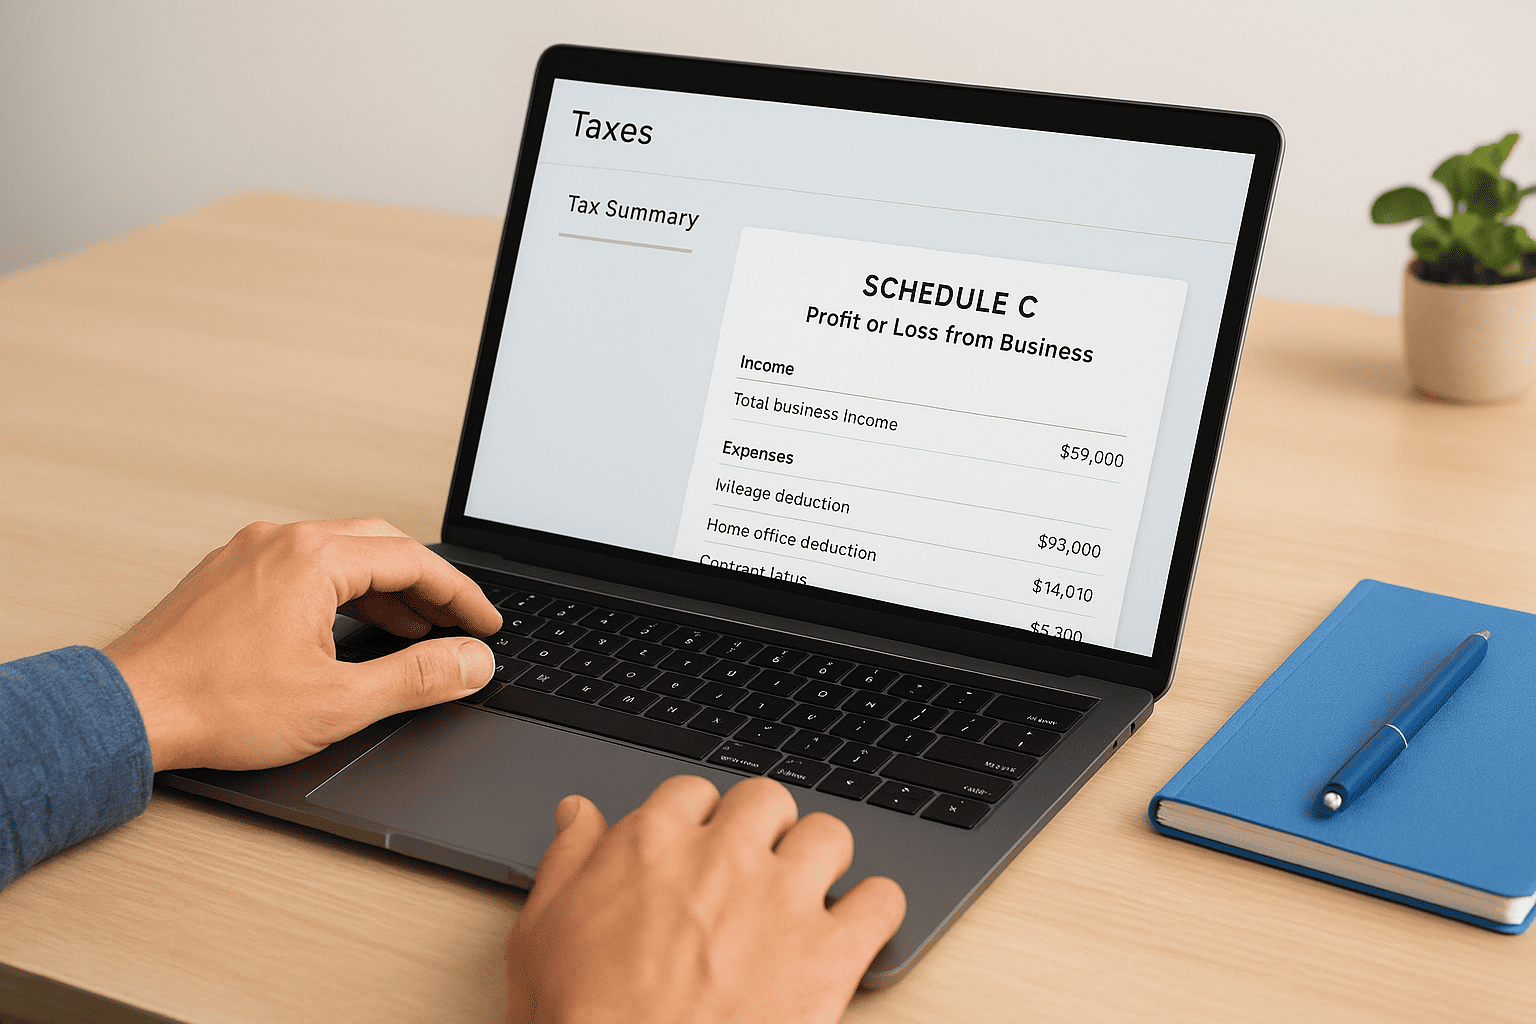
Review your Schedule C summary
Open the Taxes tab and select "Tax Summary." This report organizes your income and deductions exactly as they'll appear on Schedule C, broken out by line. Read through every line carefully and compare the totals against your own records, such as invoices, receipts, and bank statements you've kept throughout the year. Flag any category where the number looks higher or lower than you expect.
Use this checklist before you finalize the data:
- Total business income matches the sum of all invoices and payment records you issued during the year
- Mileage deduction reflects the full count of logged business trips, not just the ones you marked in the last quarter
- Home office deduction applies only the correct percentage of qualifying expenses, not the full cost
- Contract labor includes every payment you made to other freelancers or contractors, especially those who received a 1099-NEC from you
- Meals deduction shows 50% of the total meal expenses, not the full amount
Double-check the contract labor line against your 1099-NEC filings before you export, because a mismatch between what you deducted and what you reported is a common IRS matching issue.
Export your data for filing
QuickBooks Self-Employed connects directly to TurboTax Self-Employed, which is the most straightforward export path if you file through Intuit's ecosystem. Inside the Taxes tab, select "Send to TurboTax" and follow the prompts. Your income, expenses, and mileage totals transfer automatically into the correct Schedule C fields.
If you work with a tax professional or use a different filing platform, download the Tax Details PDF and the Profit and Loss report from the Reports tab. These two documents give your preparer everything they need to complete Schedule C accurately. Send both files along with your mileage log and any supporting receipts for expenses over $75, which the IRS may request as substantiation during an audit. Store a copy of each document in a secure folder before you hand them off.
Common issues and how to fix them
Even when you follow the setup steps correctly, QuickBooks self-employed tax calculations can drift off course. The most damaging problems are usually quiet ones: a miscategorized transaction that accumulates over months, or an estimate that never got updated after a major income change. Catching these issues early keeps your return accurate and prevents a payment shortfall that triggers IRS penalties.
Transactions sitting uncategorized for too long
Uncategorized transactions don't appear on your Schedule C summary or profit and loss report, which means your deductions are understated and your profit figure is unreliable. Open the Transactions tab and filter by "Needs Review" to see everything that's waiting for your input. Work through the list in order and assign each transaction a category, a business or personal label, and a split percentage if it covers both.
If you have more than 30 uncategorized transactions, work backward from the most recent quarter first so your current estimated payment reflects accurate data before the next deadline hits.
If the same vendor keeps landing in "Needs Review," set a default category rule for that merchant. Select the transaction, assign the category, and check the box to apply it automatically going forward. That removes the same item from your review queue permanently.
Quarterly estimates that feel too high or too low
When an estimate looks wrong, the cause is almost always a stale tax profile or missing income entries. Go to your tax profile settings and confirm that your filing status, number of dependents, and any additional W-2 withholding are still current. If your situation changed mid-year, such as getting married or losing a dependent, update the profile immediately so the estimates recalculate with the correct inputs.
If your estimates are consistently lower than what you actually owe at filing, you likely have income hitting accounts that aren't synced to QuickBooks. Add every payment channel you use as a connected account or manual entry. A freelancer who gets paid through Venmo Business, a bank transfer, and a check all in the same month needs to make sure all three sources appear in the software before the quarterly numbers become trustworthy.
Mileage logs with missing or vague trips
Incomplete mileage records reduce your deduction and create a documentation gap the IRS can challenge. Open your trip log, filter for any entry labeled "Unknown" or left blank, and add the destination and business purpose. Going forward, write specific trip descriptions at the end of each drive while the details are still fresh.
Finish your return with confidence
Following the six steps in this guide gives you a complete, reliable picture of your self-employment income, deductions, and quarterly obligations before filing day arrives. Your QuickBooks self-employed tax data is only as accurate as the habits you build throughout the year, so keep your transactions categorized, your mileage logged, and your tax profile current every month rather than waiting until April to sort it all out.
Even with the right software in place, the numbers QuickBooks produces don't always tell the full story. Tax planning decisions like S-corp elections, retirement account contributions, and multi-state filing obligations require professional judgment that no app can replace. If your self-employment income has grown, your situation has changed, or you've received an IRS notice, working with a qualified professional protects you from costly mistakes. Schedule a free consultation with Tax Experts of OC to review your return before you file.